Unbelievable Oatmeal Pancakes

american-blueberry-pancakes-440x300

There’s nothing better than pancakes on a Sunday morning and somehow they taste even better when they’re HEALTHY! I stumbled on this recipe several years ago from a creative blogger turned author Brokeass Gourmet.  They are healthy but they are absolutely fluffy, tangy, with a touch of sweetness.

Ingredients:

  • 1 C. cottage cheese 
  • 2 eggs or 4 egg whites 
  • 2 tsp honey 
  • 1 cup raw rolled quick cook oats (do not use steel cut)
  • 1 tsp baking powder
  • 1 tsp cinnamon
  • 1 tsp vanilla
  • pinch of salt
  • vegetable oil or cooking spray 
Directions:

Combine cottage cheese, eggs, vanilla, and honey together in a blender or food processor and puree until creamy. Add the oats, cinnamon, baking powder and salt and puree until mixture is smooth and resembles slightly grainy pancake batter.

Heat a very light coating of oil or spray in a nonstick frying pan or griddle over medium-high heat and cook 1/4 cup of the batter until golden brown on one side (about 1 1/2 – 2 minutes). Flip, using a spatula and cook until the other side is golden brown. Repeat until all pancakes are cooked.

Serve, warm, with fruit, honey, a touch of butter, preserves and/or syrup.

Makes about 5 pancakes (serves 2-3).

Adapted from Brokeass Gourmet

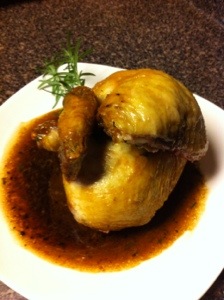
Roasted Chicken with Pan Gravy

How many ways are there to make CHICKEN? Probably a million, but nothing beats a perfectly roasted chicken especially on a Sunday afternoon. I’ve been told I’m addicted to cooking roasted meats on a Sunday and I think my family is right. There’s just something about slow cooking a meal while watching my favorite sports team. Whether a roast, stew, or chicken I’m never disappointed.

This recipe is sure to never disappoint and if you follow the Chef Secrets-Chicken listed your chicken will be perfect every time!

20140109-133034.jpg

Ingredients:

  • • 1 fresh whole chicken
  • • 1/2 onion, chopped
  • • 1 whole head of garlic, halved
  • • 1 lemon, cut into wedges
  • • 1 sprig fresh rosemary
  • • 3 sprigs fresh thyme
  • • 3 Tbsp extra virgin olive oil

Pan Gravy:

  • Pan drippings
  • 1 tsp fresh rosemary, chopped
  • 1/4 c white wine
  • 1/2 c chicken stock
  • 3 Tbsp unsalted butter, cold

Directions:

  1. Bring the chicken to room temperature by removing it from the refrigerator for at least 30 minutes prior to cooking.
  2. Heat the oven to 400 degrees F.
  3. Season the inside of the chicken with salt and pepper and fill the cavity with the onion, garlic, lemon and fresh herbs.
  4. Tie the legs and tuck the wings on the bird and completely dry the outside of the bird.
  5. Rub the olive oil on the skin of the bird and season with salt and pepper.
  6. Place the bird on its breast and roast on a cooking rack for 15 minutes on high heat.
  7. Reduce the heat to 350 degrees and rotate the chicken on the right side, basting and cooking for 15-20 minutes.
  8. Rotate the chicken to the left side, baste and continue cooking.
  9. Rotate the chicken to its back, baste, and cook until the total cooking time reaches 1 hour.
  10. Roast until the internal temperature reaches 165 between the thigh and breast.
  11. Remove the chicken from the oven to rest for at least 15 minutes before carving.

Pan Gravy Instructions:

  1. Place the roasting pan on a burner on high heat.
  2. Stir in the white wine scrapping all the drippings from the tray.
  3. Add the chicken stock and simmer for 5-7 minutes to reduce the sauce.
  4. Add the rosemary to the sauce and season with salt and pepper.
  5. Reduce the heat and stir in the cold butter to thicken the sauce and serve.

Chef Secrets-Chicken

Image

Who couldn’t use a little extra help in the kitchen? There are always easier ways to make that special dish more special or save time in the kitchen and thus Chef Secrets was created! This is a new series on my blog to share great tips and tricks of the trade and hopefully you’ll share some of yours as well!

The beginning of the year is usually a time where most people are extremely health conscience, but clean healthy eating does not mean NO FLAVOR. Here are today’s Chef Secrets to creating delicious chicken every time!

  • When choosing poultry, make sure there is no liquid residue either wet or frozen on the bottom of the package. Excess liquid means the meat has been frozen and the cells have released a percentage of the liquid. When cooked the bones will be darker than a fresher bird.
  • Apply pressure to the breastbone of the poultry before buying. If they bone isn’t pliable, the chicken is older and will not be as tender when cooked.
  • Did you know you CAN freeze a chicken IF the chicken has been defrosted in the refrigerator and has not remained the refrigerator more than 2 days.
  • FREE-RANGE chickens are more flavorful than closed cooped chickens. Free-range chickens are ale to move around the yard therefore, developing more flavor. If possible, purchase young free-range chickens for maximum flavor and tenderness.
  • To create a flavorful roasted bird every time, roast your chicken on the SIDE for 15 minutes, basting and alternating sides until the final 15-20 minutes of cooking. Roast the bird on it’s back for the final 20 minutes. Your chicken breast will be moist and flavorful!

What’s the diff? Just some quick notes to help you understand the difference between chickens!

  • Broilers/Fryers: 7 week old birds that weight from 3-4 pounds.
  • Roasting Chickens: Hens weighing between 5-8 pounds and have more fat than broilers
  • Stewing hens: 1-year-old birds weighing 4-8 pounds. Retired laying old hens that need to be slow roasted, but full of flavor.
  • Capons: 10 week old castrated roosters weighing 8-10 pounds.
  • Rock Cornish Game Hens: 4-6 week old chickens weighing 1-2 pounds are a hybrid between Cornish and Rock chickens.

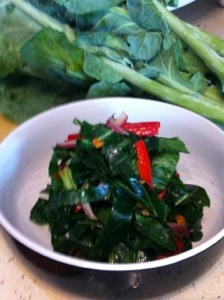
Marinated Collard Greens

20131210-231717.jpg

I absolutely love finding a new twist on an old favorite! Living in the south, collards are a stable, but “how” you cook them is pretty standard. Imagine my surprise when my boyfriend and I stumbled across marinated collards at the market. I envisioned this flavorful explosion of flavors that matched the bright colors! NOT! The greens were very very firm and while the colors were great the flavor was lacking.

If you don’t know me by now I am the queen of “I can make that at home”! So here we go!

Ingredients:
• 1 pound fresh collard greens, cleans and sliced
• 1 C. carrots, julienned
• 1 red onion, julienned
• 1 red bell pepper, julienned
• 1/2 C. rice vinegar
• 1/2 C. olive oil
• 2 tbsp honey
• 1 tsp dried mustard
• 1 tsp celery seed
• 1/2 tsp garlic, minced
• 1/2 tsp kosher salt
• 1/2 tsp fresh cracked black pepper

Directions:

1. Clean and slice the collards removing the tough stalk.
2. Add the julienned carrots, peppers, and red onions.
3. Combine the vinegar, oil, dried mustard, salt, pepper, celery seed, and honey in a sauce pan and bring to a boil.
4. Pour the sauce over the fresh veggies and toss.
5. Place the salad in a heavy place deal bag and force all the air out of the bag.
6. Marinate the salad for as little as 24 hours or up to 2 days.

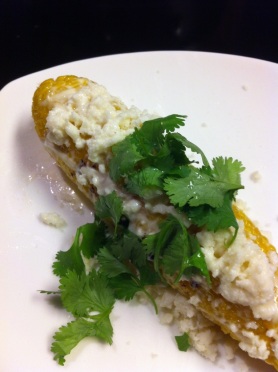
Mexican Street Corn

SUMMER! I think I have a love hate with summer. On one hand living in the South I loath the summer humidity, constant evening pop up storms, and a cosy low of 80 degrees 😒. On the plus side, I love, love, love the music in the parks, lazy days with family and friends, holiday celebrations, my birthday, and most importantly SUMMER FRUITS & VEGGIES!
Armed with an array of summer herbs, I’ve been experimenting with flavorful recipes so here we go!

20130728-203244.jpg

Ingredients:
4 ears fresh summer corn ears
4 Tbsp butter
1 1/2 C. mayonnaise
1 C. Mexican queso cheese, chunked
Kosher salt
1 bunch fresh cilantro, chopped
Aluminum foil

Directions:
1. Pull back the husk of the corn ears, remove the silk from the corn.
2. Rub the pads of butter on the ears of corn and sprinkle with kosher salt.
3. Pull the husk over the corn and roll the corn in aluminum foil.
4. Place covered corn on medium-high grill grates for 30 minutes rotating periodically to cook evening on all sides.
5. Remove the corn from the grill then removing the aluminum foil and husk.
6. Smooth mayonnaise over the ears of corn.
7. Break the queso into small chunks and sprinkle over the corn.
8. Top the ears of corn with chopped cilantro and serve.

Honey Mustard Chicken with Crispy Bacon

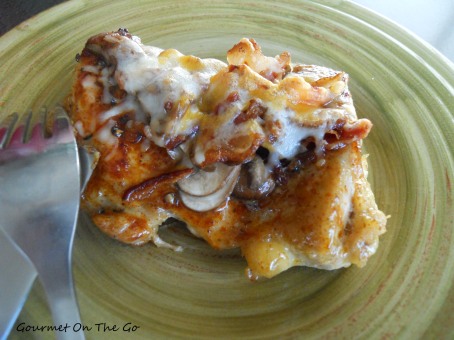
Who doesn’t love a great piece of chicken, crispy bacon coupled with creamy sharp cheddar cheese. As you know I love taking ingredients we use everyday in the kitchen and create something fresh, new, and absolutely delicious! Juicy chicken thighs and a tangy honey mustard marinade will make this recipe a keeper for your family! Let’s get started!

DSCN1519

Ingredients:

Marinade-

Chicken-

  • 4 chicken thighs, boneless and skinless
  • 8 slices of bacon, cooked and crumbled
  • 1 Tbsp canola oil
  • 1 ½ C. mushrooms, sliced
  • 2 Tbsp salted butter
  • 2 C. cheddar cheese, shredded
  • 2 tsp. paprika
  • Salt, to taste
  • Fresh cracked pepper, to taste
  • 2 tsp. fresh parsley, chopped


Directions:

  1. Combine the marinade ingredients in a bowl and whip until blended, about 30 seconds.
  2. Place the chicken thighs in a zip lock bag and pour 2/3 of the marinade over the meat, seal and place in the refrigerator for at least 2 hours or overnight.
  3. Place the remaining marinade in a container and place in the refrigerator.
  4. Remove from the chicken from the marinade solution and preheat the oven to 375 degrees.
  5. Place an oven proof skillet on the stove top and heat 1 Tbsp of canola oil over medium high heat.
  6. Sear the chicken in the pan until golden brown on each side, 4 minutes each depending on heat.
  7. Remove the PAN from the heat and brush the chicken thighs with the RESERVED  honey mustard marinade.
  8. Season the chicken with salt, pepper, and paprika.
  9. In a separate pan, heat 2 Tbsp of butter and sauté the sliced mushrooms.
  10. Top each chicken thigh with equal portions crumbled bacon.
  11. Top each chicken thigh with equal portions of saute mushrooms.
  12. Divide the sharp cheddar cheese and place on top of each chicken thigh.
  13. Place the pan in the oven and bake for 8-10 minutes until the chicken is cooked through and the cheese is melted.
  14. Remove from the oven and sprinkle with the parsley garnish and serve.

Sugar Crusted Popovers

If you’re like me you’re always looking for something a little different when it comes to cooking.  I will be the first to admit I’m not a huge bread fan, but when I do make bread, biscuits, or rolls, I like to go outside of the box and look for unique.  I started playing with popovers  changing the texture and taste and of course experimenting on my family 🙂

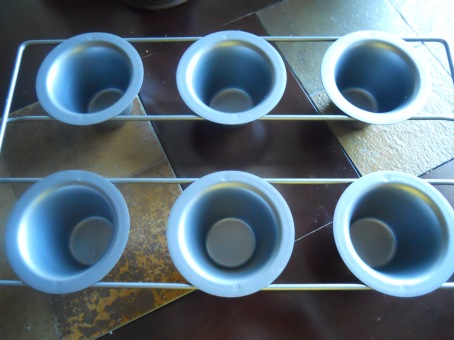
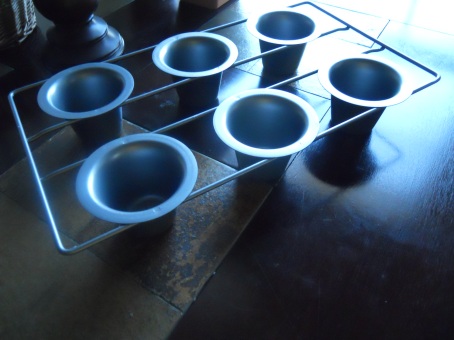
Popovers are basically dinner roles that “POP OVER” the baking pan. The batter will be very thin, almost liquid like, but I promise you this recipe will work out perfectly.  After several batches, I decided it needed a touch of sugar in the batter for my taste.  Keep in mind, this recipe is PERFECT as a sweet OR savory bread.  There are two important tips to creating perfect popovers:  First,  use a POPOVER pan to create this delicious treat. The pan is high on the sides, deep, and allows air to flow properly so the bread will rise. You can use a muffin tin, but you may not experience the same height.

DSCN1607

 Second PRE-HEAT the popover tin, BEFORE you fill the tins with the batter. This will ensure a beautifully tall popover!

DSCN1608

DSCN1574

Ingredients:

  • 4 large eggs, warmed in a cup of hot water for 10 minutes before cracking
  • 1 ½ C. milk (skim, low-fat, or full-fat), lukewarm
  • 1 ½ tsp sugar
  • ½ tsp salt
  • 1 ½ C. all purpose flour
  • Tbsp. melted butter
  • 1 C. sugar
  • 1 tsp. ground cinnamon

Directions:

  1. Preheat the oven to 450°F. Position a rack on a lower shelf. The top of the fully risen popovers should be about midway up the oven.
  2.  Grease the pan thoroughly, covering the area between the cups as well as the cups themselves. Make sure the oven is up to temperature before you begin to make the popover batter.
  3. Place the tin in the oven to get it warm.
  4.  Use an immersion blender OR use a blender to beat together the eggs, milk, sugar and salt until well combined, with no streaks of yolk showing.
  5.  Add the flour all at once, and beat until frothy; there shouldn’t be any large lumps in the batter, but smaller lumps are OK.
  6.  Stir in the melted butter, combining quickly.

  7. Pour the batter into the muffin cups, filling them to  3/4 full.

  8.  Make absolutely certain your oven is at 450°F. Place the pan on a lower shelf of the oven .

  9. Bake the popovers for 20 minutes without opening the oven door. Reduce the heat to 350°F (again without opening the door), and bake for an additional 10 to 15 minutes, until they’re a deep, golden brown. If the popovers seem to be browning too quickly, position an oven rack at the very top of the oven, and put a cookie sheet on it, to shield the popovers’ tops from direct heat.

  10. If you plan on serving the popovers immediately, remove them from the oven, and stick the tip of a knife into the top of each, to release steam and help prevent soggy rolls.

  11.  If you want the popovers to hold their shape longer without deflating and settling quite as much, bake them for an additional 5 minutes (for a total of 40 minutes) IF you can do so without them becoming too dark. This will make them a bit sturdier, and able to hold their “popped” shape a bit longer.

  12. Mix the extra 1 cup of sugar and 1 tsp cinnamon in a mixing bowl.
  13. Toss each popover in the cinnamon and sugar mixture to coat and serve.

Traditional Kimchi

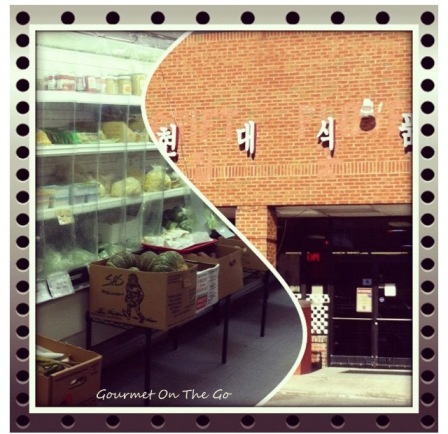
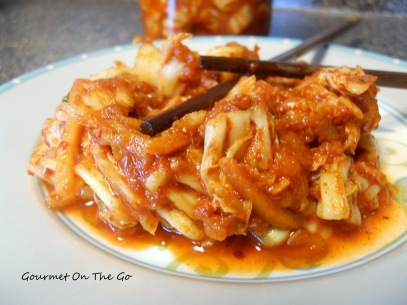
As an Army brat, I grew up with an extremely diverse group of friends and a lot of exposure to international cuisine.  My love of Korean food stems from my cousin and her husband who is biracial and part Korean. So one day they decided to take us out to dinner to a Korean grocery store that was also a restaurant (insert side glare). Needless to say, I was SCARED! That was the day I fell in LOVE! From bim bim bap(vegetables over rice with a sunny side up eggs)  to bulgogi (marinaded beef or pork), I love it all. I usually gather my goodies from our local Asian market. I’m there so much, I should know how to speak the language, but alas I’m stuck with pointing and googling titles 🙂

photo

My natural progression was to try my hand at making Kimchi and it was much easier than I thought! Kimchi is fermented vegetables with a variety of seasons. I will say there are many recipes for kimchi, but I prefer to make mine with more of a sauce versus a slurry. The slurry mixture makes the mixture a bit more thick, I prefer the sauce because I like to use my kimchi several different ways. It can be used as a side dish, stirred into fried rice, or added to make a kimchi pancake(kimchijeon)! I know trying new foods is a bit scary, but step out of the box with me and give it a try.

Let’s get started!

DSCN1606

Ingredients:

Sauce:

  • 8-10 garlic cloves, grated
  • 1 heaping tablespoon fresh ginger, grated
  • 1 grated daikon radish*
  • 1 C carrots, julienned
  • 1 C water
  • ¼ C salted shrimp*
  • 2 tablespoons fish sauce
  • 1 to 1 1/2 cups Korean Red Pepper Powder
  • 1 bunch green onions, sliced
  • 1 grated asian pear*
  • ¼ C. salt
  • 1 teaspoon toasted sesame oil
  • 3-4 canning jars

*These items can be found in your local Asian market; however, I have found the asian pear and daikon radish in local markets.

Directions:

  1. Cut the napa cabbage and quarter it length wise keeping the base in tact.
  2. Make sure the leaves are still connected at the base, gently separate the leaves and sprinkle salt between each section placing more salt close to the base than the tip of the leaf.
  3. Place the quartered napa cabbage in a container that’s deep enough to cover the cabbage with water.
  4. Place a heavy object on top of the cabbage and let the cabbage sit for at least 1 hour but preferably overnight.
  5. Next combine all of the sauce ingredients in very large bowl.
  6. Once the cabbage is brined, rinse, drain, and chop the cabbage.
  7. Toss the cabbage with the sauce mixture until coated.
  8. Place the mixture into the  fermenting vessels and cover with lid.
  9. Make sure not to over pack the jars, leaving at least 1″ of space at the top. If you pack your jar too full you will have a very stinky kitchen.
  10. Let the jars sit on the counter top for at least a day and then place into the refrigerator.
  11. Use the kimchi within 2 weeks. After that you will want to discard it because it will get too strong for use.

Quinoa Tabbouleh

So I love finding eclectic foods and giving them a whirl! This recipe starts off with a couple of definitions because I know trying new foods can sometimes be a bit intimidating (yes as adventurous as I am there are some foods even I am afraid to try).

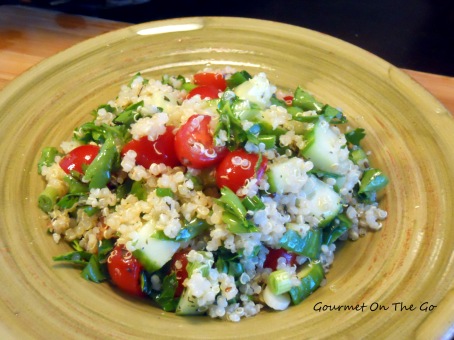
Let’s start with Quinoa! Yes,  it looks unusual and not many people have tried it, but it is a DEFINITE power house food! Quinoa is categorized as a grain, but it’s actually an edible seed.  It’s lower in carbs than most grains, loaded with protein, and the same caloric value as brown rice.   With all of these benefits, why not give it a try?

Then there’s tabbouleh! Tabbouleh is an arabic salad traditionally made of bulgur although sometimes bulgur has been substituted with couscous.

If you’re looking for something new to try that’s absolutely healthy give this recipe a try as a main vegetarian course or a healthy side dish!

DSCN1603


Ingredients:

  • 1 C. quinoa, rinsed
  • ½ tsp. kosher salt
  • 3 Tbsp. lemon juice
  • 2 garlic cloves, minced
  • ½ C. olive oil
  • 1 large English hothouse cucumber, cut into ¼ inch pieces
  • 12 cherry tomatoes, halved
  • ½ C. flat-leaf parsley, chopped
  • ½ C. fresh mint, chopped
  • 2 scallions, sliced thinly

Directions:

  1. Place the quinoa, ½ tsp kosher salt, and 2 cups of water to boil over medium high heat in a medium saucepan.
  2. Lower the heat, cover the saucepan and simmer for 10 minutes.
  3. Remove from heat and let stand, covered, for 5 minutes and fluff with a fork.
  4. After fluffing, spread the cooked quinoa on a large baking sheet to cool throughly.
  5. When cooled, placed quinoa in a large mixing bowl.
  6. While the quinoa is cooling, mix the lemon juice and minced garlic in a bowl.
  7. Slowly whisk in the olive oil and season the dressing with salt and pepper to taste.
  8. Add ¼ C. of the lemon dressing.
  9. Add the vegetables, herbs, and scallions to the quinoa. Toss.
  10. Season with kosher salt and pepper to taste.
  11. Drizzle with the remaining dressing.

Serves 6

Adapted from Bon Appetit


Mexican Rice Bowl

This is one of my FAVORITE recipes! Have I said that before? I’m sure I have but I REALLY mean it lol! The perfect combination of cilantro, lime juice, black beans and corn and you’re in heaven. This recipe is perfect as a meal topped with a fresh salsa and you are instantly transported to HEAVEN. Take a peek!

531951_382830805138891_353502694_n

Ingredients:

  • 1½ C long-grain white rice, uncooked*
  • 1 small onion, chopped
  • 1 package smoked mexican turkey or chicken sausage, cut diagonally
  • 1 Tbsp extra virgin olive oil
  • 14 oz chicken broth or stock
  • 1¼ C water
  • 1 can black beans, rinsed and drained
  • 1 C. whole kernel corn, frozen or fresh
  • 2 Tbsp fresh cilantro leaves, chopped
  • Kosher salt, to taste
  • Crack pepper, to taste

Directions:

  1. Preheat the oven to 375 degrees.
  2. In a large mixing bowl, combine long-grain rice, onion,sausage, and extra virgin olive oil ensuring the rice is completely coated.
  3. Place the chicken broth and water in a medium-sized pot and bring to a boil.
  4. Place the rice mixture into a casserole dish or Dutch oven.
  5. Pour the broth mixture into the casserole or Dutch oven and place a cover over the container.
  6. Bake for 30 minutes.
  7. After 30 minutes, stir in the black beans, corn, and cilantro.
  8. Cover and bake an additional 15-20 minutes or until all of the liquid is absorbed.
  9. Remove the casserole from the oven.
  10. Top the completed dish with fresh salsa to garnish.

*long-grain rice works BEST for this dish to avoid excessive gumminess.